Wednesday, October 26, 2011

End of Summer Soup

This weekend my community came together to create the Big Pink Ribbon at Fantasy of Flight. Thousands of men, woman and children all wearing pink T-shirts stood on the tar mat to form a Big Pink Ribbon to raise awareness of breast cancer. The morning also included a survivors walk. 

(source: all over facebook, couldn't find the original)
Like most families, breast cancer has impacted my life and anything I can do to help count me in. It didn't hurt that it was perfect weather spent with the best of friends.


The next civic activity for the day was the Haines City Main Street Margarita 5k. Margaritas and a fun run? Count me in. Too bad the margaritas weren't until the end...


Geoff ran with me and even though we both ran with music, we had a good time. It was a VERY small race (its first year) so I placed 2nd. It is always fun to place, no matter how small the race is.


Needless to say, it was a long day and dinner consisted of whatever we could throw on the grill but earlier in the week I made my favorite soup thus far. The key to this soup (in my opinion) is to cut all of the vegetables the same, tiny size. The easiest way to do this? Use a chopper. They are amazing and a huge time saver.

End of Summer Soup

1 Tablespoon EVOO
1/2 onion, diced
2 carrots, diced
28 ounces chopped tomatoes, drained & squished  
3 cloves garlic, pressed
1 cup frozen baby lima beans
4 cups veggie broth
1 zucchini, diced
1 cup mushrooms, diced
1/2 quinoa, rinsed
1 can white beans, drained & rinsed
2 Tablespoons Mrs Dash


Heat EVOO over medium, low heat until warm. Add the onions and carrots, allowing to brown for about 5 minutes. If vegetables begin to stick pour a tablespoon or two of your vegetable broth. This keeps the taste perks of browning but keeps the fat calories low.


Add you can of tomatoes, I prefer to use whole tomatoes and squeeze them by hand.


Add the garlic.


Add the baby lima beans. No need to thaw because they will be in the pot long enough.


Now add your veggie broth. I warm mine first to speed of the cooking but that is not necessary.


Stir all of the ingredients together and bring to a simmer. Allow to simmer for about fifteen minutes with the lid on.


Once your vegetables are tender add your zucchini.


Add your mushrooms.


Add your quinoa to the pot.


Return pot to a simmer and add your Mrs Dash or other salt free seasoning. Simmer for about fifteen minutes or until quinoa has cooked.


Add your white beans and warm through.


Serve in bowls and top with pesto if you have some in your fridge :)

There is a ton of protein in this soup with the quinoa, lima beans and white beans. Next summer I will have to triple the recipe.

.live creatively well.
-nicole.

Friday, October 21, 2011

Paint + Fabric + Wood = Chairs

We have finally finished a project that we started AND we finished in record time. By record time I mean less than a week.

We can now have a dinner party that does not require people to stand around a dinning room table.

My can I mean we should and I would like to... someday.

To begin, a few months back I these unfinished wood chairs. They are currently on sale but they were on sale even more. I think we paid $199 a set and had a discount code and free shipping. You can't beat that. Well you can if you buy chairs that come to your door ready to go and don't have 10 steps before they are usable. That is beyond the point. That was actually our first plan. I found some that I loved at Ballard Design, called to have them put on hold at the store in Tampa, we drove there & guess what? Someone came in and bought the chairs I had on hold. They felt bad (or so they said) but they were discontinued and did not have four left anywhere.

Plan B was to search and search and I could not find any that I loved more than the Ballard Chairs.

Plan C was to make some that I loved more. I tried searching vintage and thrift stores but they were all going to cost around $100 each and required stripping or sanding then refinishing.

Plan D was to buy them ready to DIY. I already had fabric and we DIYed our benches and they turned out alright so plan D was the winner.

Four boxes arrived at our door with bags of hardware but the quality was great. Geoff bought a spray gun that we have used many times and went to work.


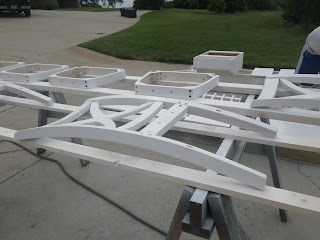
After laying everything out of saw horses at your parents house, while they are out of town.... the fun work begins.

These chairs came ready to prime but you must first wipe them down with a wet rag. This will remove any dust or dirt that has accumulated (while sitting in the closet for a few months). Your rag should be fairly wet but not dripping.


After they dry, which will be by the time you finish, you are ready to prime. Be sure to follow whatever directions that have come with your spray gun or if you use spray paint that saves the step of watering down the paint. Be sure to ask your paint pros at the store want paint they recommend for the type of wood you are painting. There is a de-yellowing primer that we have never used but should have on a few projects. This primer is supposed to prevent the softer, darker wood from yellowing through your paint.


Geoff painted because it was Geoff's spray gun. He bought me one a few months ago that I still haven't had an opportunity to use. I think that was the point.


Once they were painting, we let them dry over night. We moved them into the covered barn to prevent dew from forming.


Before painting the two coats of actual paint, there are a few steps to follow.
  1. Use steel wool to lightly rough up the primer
  2. If you are using a compressor and spray gun, blow the chairs clean
  3. Be sure to wipe down the chairs again
All of this will ensure your paint will stick to a clean surface.

For paint, we chose to go with Behr Premium Plus Ultra Pure White Interior Flat Enamel. Its scrub able. We used this paint on our dresser and have had great results being able to clean it.


Geoff painted two coats on the chairs. A good hint is to be sure you paint the backs first. Even if you let them dry for a long time there is still a chance of them sticking.


Be sure to let them dry again over night before you try to assemble them. This time we brought them inside to prevent dirt or dew.

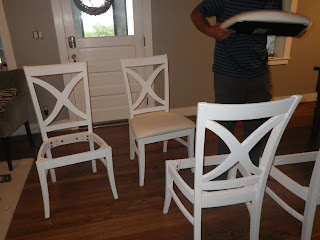
Geoff surprised me by putting the chairs together during his lunch break. He said they took about an hour but this included eating lunch and watching the weather...


Aren't they pretty. Notice the cushions? They are meant to be covered. I hope they are.

A few months back, I went to a fabric store and fell in love with a few fabrics. The first fabric I turned into my benches, the second is destined to be pillows and the third is to cover these chairs. Perfect.


I had two yards of fabric and was able to cut off a foot from each end. I then layed the cushions down and cut four squares. I decided that I didn't want to have the same pattern on each chair for fear of them not coming out perfect. I did want them to all have the pattern vertical because of the "wood grain" pattern.


The fabric looks really shinny in this picture. It isn't, I promise. Geoff then screwed the cushions down so they wouldn't move. If we ever want to put new fabric on we will just have to unscrew them. I hope we don't for a long time. Even though it only took about 10 minutes a chair to recover it took some time. The recovering process just involved me holding the fabric and Geoff using a staple gun. No sewing required.


We made four. Three really only fit at the table but you can make four work if you have to. For now we are using the fourth at the computer desk.


I love the fabric and the shape of the chairs. Do they look homemade? Slightly, yes but they make me happy.

Cost break down?
  • Two sets of chairs at $199 a set (no tax or shipping)
  • Fabric $10 for two yards (still have enough left to make a pillow or two)
  • Paint $14 for a quart
  • Primmer, spray gun, fiance already owned
Total: $422 for four chairs = $105 a chair

Not bad.

There was three more projects that day that I have to finish & then I get to share!

.live creatively well.
-nicole

Tuesday, October 18, 2011

This weekend progress was finally made! The house has been low on the priority list. Remember the tree planting...?  

By progress, I mean projects got started and by projects I mean painting:


Here is a before picture & I plan on going into detail once these 3 projects are complete. We have a large check list of projects to complete before Thanksgiving & these three were on the list!

One of my favorite things to do (when I have time) is to go treasure hunting. Before my friend C (6 Petals) moved north we would spend our lunch breaks exploring some of the most random thrift and vintage shops. A few months ago, I saw a post card on Momma Pink Strings refrigerator for an auction for a restaurant that was going out of business. I asked if I could tag along. It was a long morning, in an unairconditioned building but I left with one of my favorite treasures yet... An old feed scale. It is amazing how competitive people can get in an auction but I totally understand. When you want it, you have to have it. One suggestion is to write down the max you want to spend on an item so you don't get carried away. Trust me....

This scale has been sitting on the floor in our kitchen since the day I brought it home. I knew I needed to find a chain that wasn't shinny & brand new and I needed to figure out a way to hang the thing.

After digging through the barn we found lots of chain but the chain we ended up using had been sitting above the scale for months. We had left over chain from the light fixture above our table (which I haven't shared yet. I will soon. Promise) and I left the chain sitting on the microwave table since the day the fixture was installed because I just wasn't sure what to do with it. It happened to be the perfect height & color. Score.

The hanging part I left up to Geoff. This way if it falls it isn't my fault :)


I should have taken pictures of what we used but I was in the middle of rolling my veggie sushi. It was basically a large hook that he screwed into the beam in the attic. He actually got in the attic and measure where the beans were. Way more effort than I would have put into it... Its not going anywhere.


Eventually there will be cabinets below but right now it adds something fun and different to this corner. I think I can store produce or even flowers in it for decoration. It even has practical uses: weighing broccoli for a broccoli soup recipe that I will share soon.


Its an unexpected addition to our kitchen but it makes me smile.

I am so excited to share all of the painting projects & multiple soup recipes with you soon!

.live creatively well.
-nicole.

Thursday, October 13, 2011

Veggie Sushi

This morning my life flashed before my eyes. Well not my entire life but the part of my life that is racing in Miami Man in exactly one month...

Geoff & I went for our bi (sometimes solo or tri) weekly 5 am run. We were set to run 4 miles in the dark. The darkness is one of the main reasons Geoff runs with me even though he claims to enjoy it. I can only run on a consistent basis during the week at 5am and our town is very dark in the morning. The stars, moon and occasional pair of head lights are the only source of light. The roosters are still asleep when we finish our run.

Its cool out, its peaceful and its nice to run with someone but on to the reason of of the "light flashing"...

We were about 2 miles into our estimated 4 mile run and I manage to step right in a pot hole and nearly fall flat on my face. The ankle rolled & Geoff caught my fall. Thank goodness. But then came the pain. It hurt but I think it was my fear that hurt the most. All I could think of in that 30 seconds was not being able to complete in the race that I have been training for.

I am sure we have all had close calls. I thank my strength and balance training for not spraining my ankle. Ever since the high school volleyball days, I have been a strong believer of balance training. This is basically doing basic exercises standing on a single leg. We were "forced" to wear ankle braces to play volleyball to prevent ankle sprains. I refused because these braces made every ones ankles so weak and dependant on the braces. I never sprained my ankle. A few rolls here and there but nothing that kept me off of it. I even finished the last two miles this morning. Its tender now but nothing to worry about.

This was the view on my way out of the house this morning.  


I wish I was able to run at this time.

Today I had a board meeting at the Maitland Art & History Museum and I thought I would share a few pictures of this fun location.


Guessing what is going to be for dinner has not been very high on my priority list lately. I am a big planner and when I plan a week of dinners, they all get cooked, we eat well, and life is good but when there is not plan I end up buying a bag of brown rice pasta, a jar of pasta sauce, and throw whatever aging veggies that are in the fridge in the pot and call it dinner. Still tasty and 100% ok upon occasion but not on a regular basis :)

I always like to try to cook or prepare a fun dinner on Sundays. It is a great time to make a special dinner that may have a few more steps then time allows during the week & left overs for lunches are a plus.

So what was our dinner? Well if you follow me on twitter (PStringandGBean) you may already have been informed, multiple times. Veggie Sushi!

I love the idea of veggie sushi but nowhere in my town serves it with the option of brown rice. Whole Foods does and I get it too often but it is pricey. So we made it at home. I looked forward to it all week.

It is so simple.

Veggie Sushi

1.5 Cups Short Grain Brown Rice
3 Cups water
2 Tablespoons brown rice vinegar
2 Tablespoons brown rice syrup
Variety of Veg, sliced to matchsticks (I used bell pepper, avocado, cucumber, and carrots)
Toasted Nori Sheets
A sushi rolling mat will help.

Begin by cooking the rice according to package directions. You could use sushi rice, which is white short grain rice. It takes less time too cook but it has the nutrients stripped and I prefer the taste of the brown.


After the rice has cooked, remove it from the pot to allow to cool faster. You shouldn't make sushi with hot rice. While the rice is cooling, in the smallest sauce pot you own, combine the brown rice syrup and brown rice vinegar. Whisk until the syrup has dissolved. This will only take a few minutes over low heat. Pour this sauce over the rice and stir. Sushi restaurants will use brown rice vinegar and sugar. Bet you didn't know that your sushi contained added sugar!


Prep your veggies by cutting them into thin matchstick pieces.


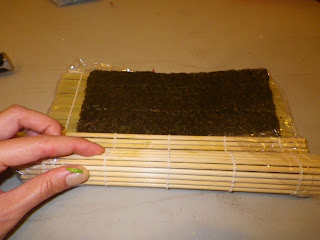
If you have a bamboo rolling matt your life will be easier. I borrowed this one from Momma Pink String. I also chose to cover it in plastic wrap "just in case" since it wasn't mine to ruin. I knew my last few rolls would be tuna rolls for Geoff...

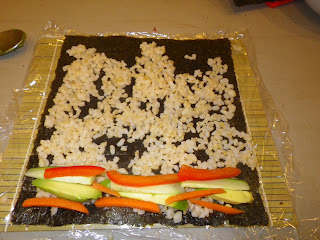
Grab a sheet of nori and place it shiny side down on the matt. As you can see I had the matt facing the wrong way at first. I figured that out real quick. You now have a few options as you see below. You can just put a layer of rice on the first inch or so or you can cover the whole sheet. I actually prefer less rice but I wasn't sure so I tried multiple ways. I also did one with rice on the outside.... I only made one of those. Not as basic.


Now line your veggies on top. I chose to use red bell pepper, carrots, cucumber, and avocado. I knew I wouldn't be using all of the individual veggies so I chose what I would use on salads throughout the week.  


You can see both options below.


Now roll. The key here is to start it tight and use both hands, squeezing as you roll. You will keep the bamboo on top. Below the bottom picture is a good YouTube video on how to roll sushi. After the sushi roll is rolled when your fingers and white the edges to soften. The nori sheets will soften on their own in a few minutes.


You can see the different methods I tried below. My favorite was the super skinny one because of the lack of rice but they were all very good.


Once the nori has softened slightly, I used a serrated knife to cut a roll into bite sized pieces.


Besides the length of time to cook the rice and cutting the veggies the dish came together very fast. I managed to make about 7 rolls for the price of about 2 at a sushi restaurant.

For Geoff we made tuna rolls from tuna his family caught and we steamed edamame.

So much fun for a Sunday night!

Sunday, October 9, 2011

8 Months & Tomato Soup

Wow! We are only 8 months away from our big day. For some reason, 8 months feels further away than 9 months. I have a feeling this may have to do with the fact that I had very little time to focus on the wedding this month. 


Now lets see what I didn't accomplish this month... 

  • Order bridesmaid dresses Ordered! They should arrive in a few weeks. 
  • Order wedding shoes Ordered & returned (remember this post?
  • Get a passport Still on my list...
  • Determine information to go on invitations I need to sit down with the parents about this one
  • Find a band Yes, yes we did! 
  • Photo booth sewing project On hold at the moment
  • Finish goodie bag prep Bags sewed! 
  • Get in shape Starting today! (I promise, I wish it wasn't raining...) 
Well looking at this list, I did get a few big items crossed off. I feel so much better now that we have a band. In all actuality, the wedding could now occur because we have the venue, the dress, the food, the videography, the photographer, the music and the family & friends. Looking at it this way makes it appear so simple. 

Now for this months goals:
  • Get a passport
  • Invitations figured out. I would like to order them at the 7 month point.
  • Decide on honeymoon
  • Complete a few DIY projects
  • Keep looking for shoes (this may not happen until spring shoes come out) 
  • Book a hotel for wedding night 
This should be doable. There are a ton of things I would like to do but I think a lot of them have to wait until I meet with the rental company & a few other vendors in December. I am so excited. 

Want to know something else that I am so excited about?

Simple Tomato Soup

This couldn't get easier. I promise. 

28 ounces tomato puree
28 ounces whole, peeled tomatoes
3 garlic cloves, pressed or minced
1/2 white onion, chopped
1 celery stick
1 Tablespoon Mrs Dash (or any salt free seasoning)
1/4 cup parsley
2 cups water


Combine all ingredients in a large pot. 


Stir and cook over medium, low heat until onions are tender. The first time I cooked the soup, I cooked it for 30 minutes and the second time I left it on the stove for over an hour. The 30 minute soup was just as tasty as the hour + soup. So cook for whatever length fits your schedule. You may want to reduce the heat to low if the soup begins to boil. 


If you have a hand held blender, process soup in the pot but make sure to turn off the heat. You can also blend this soup in a blender just be sure to only fill the blender half way or the heat will cause you to make a hot mess. 


If you used no salt added tomatoes, you may want to season lightly with salt. I used salt added tomatoes and there was no need for added salt. If you like your soup thinner (like most canned tomato soups), feel free to add more water after you blend. I preferred the thicker consistency. 


We are having a ton of rainy weather down here and I am grateful I froze a few servings :) 
Now it is time to clean the bathroom & work on a few crafts for work.... 

.live creatively well.
-nicole.